m (added a gallery and video section + cleaned up info) Tag: Visual edit |
No edit summary Tag: Visual edit |
||
| (21 intermediate revisions by 3 users not shown) | |||
| Line 1: | Line 1: | ||
| − | The '''Dreadnought''' is a massive galactic warship used by [[Lord Brevon]] to achieve his goal of galactic conquest. Prior to the events of [[Freedom Planet]], the Dreadnought was locked in a space battle with the [[Spectrum Chasers]], in orbit of planet [[Avalice]]. It was shot down and it crashed in the [[Battle Glacier|Snowfields]] near [[Shuigang]]. Unphased by this setback, Brevon formulated a plan to spark a civil war between the Three Kingdoms, so he could steal the [[Kingdom Stone]] in the confusion to power up the Dreadnought, leaving the planet on the brink of war. |
+ | {{Location|Name = Dreadnought|Picture = Battle Glacier Dreadnought.png|Game = [[Freedom Planet]]|Planet = Brevon's Planet}}The '''Dreadnought''' is a massive galactic warship that is owned and used by [[Lord Brevon]] to achieve his goal of galactic conquest. Prior to the events of [[Freedom Planet|''Freedom Planet'']], the Dreadnought was locked in a space battle with the [[Spectrum Chasers]], in orbit of planet [[Avalice]]. It was shot down and it crashed in the [[Battle Glacier|Snowfields]] near [[Shuigang]]. Unphased by this setback, Brevon formulated a plan to spark a civil war between the Three Kingdoms, so he could steal the [[Kingdom Stone]] in the confusion to power up the Dreadnought, leaving the planet on the brink of war. |
| − | The Dreadnought is also the Final Stage in Freedom Planet, called '''"Final Dreadnought"''', and is divided into |
+ | The Dreadnought is also the setting of the Final Stage in Freedom Planet, called '''"Final Dreadnought"''', and is divided into 4 Rounds. |
| − | == Story == |
||
| − | [[Lilac]], [[Carol]], [[Milla]] & [[Torque]] successfully board the Dreadnought just as it begins to lift off, and they come face-to-face with Lord Brevon and the full force of his army. And so, the fate of Avalice hangs in the balance as the Final Battle for the Kingdom Stone begins. |
||
== Final Dreadnought Round 1 == |
== Final Dreadnought Round 1 == |
||
| + | {{stageTab|Final Dreadnought|Final Dreadnought 1 Stage Select Icon.png}} |
||
{{Quote|We have intruders on the ship! Mobilize!|Lord Brevon, as the heroines infiltrate the Dreadnought or, in-game, one of them starts in Final Dreadnought (Round 1).}} |
{{Quote|We have intruders on the ship! Mobilize!|Lord Brevon, as the heroines infiltrate the Dreadnought or, in-game, one of them starts in Final Dreadnought (Round 1).}} |
||
| + | '''Final Dreadnought Round 1 '''is the 9th Stage in Freedom Planet, taking place within the Ship's Main Hanger. |
||
| + | |||
{{LevelInfobox |
{{LevelInfobox |
||
| − | |Name= |
+ | |Name=[[File:Final_Dreadnought_Title_Logo.png|Round 1]] |
| + | Round 1 |
||
|Picture=FinalDreadnought1.jpg |
|Picture=FinalDreadnought1.jpg |
||
|Game=Freedom Planet |
|Game=Freedom Planet |
||
| Line 17: | Line 19: | ||
[[Milla Basset]] |
[[Milla Basset]] |
||
|Speedrun=5 minutes |
|Speedrun=5 minutes |
||
| + | |Theme=[[File:Final Dreadnought 1.ogg|Final Dreadnought 1|center]] |
||
|Boss=[[Syntax]] (Morpher Mode) |
|Boss=[[Syntax]] (Morpher Mode) |
||
|previous = [[Battle Glacier]]|next = Final Dreadnought Round 2}} |
|previous = [[Battle Glacier]]|next = Final Dreadnought Round 2}} |
||
=== Area 1 === |
=== Area 1 === |
||
| − | The area begins as the player |
+ | The area begins as the player bursts through the walls, running through corridors of the ship ([[Milla]] will enter through a hole in the ceiling instead). As that happens, Brevon can be heard saying, "We have intruders on the ship! Mobilize!" These corridors have plenty of enemies to deal with and traps to avoid, such as swooping lasers and energy orb-producing pillars. The level also introduces teleporters that can be used to get around the area, as well as platforms on rails that can be used to get across gaps in the floor. Further throughout the area, Brevon will appear on the screen in the background, give out a snarl, and say "GET THEM.". In this section, it's recommended to hop into teleporter located near this area and grab an Invincibility [[Shield Crystals|Shield Crystal]], as the section contains a large group of enemies, such as [[Shade Elite|Shade Elites]] and Tankbots. After that, it's a few more teleporters and rail platforms and a shorter straightaway to the exit. |
=== Area 2 === |
=== Area 2 === |
||
| − | Shortly after the player enters this area, Brevon will shout "Open the airlocks!" as the airlocks open up, creating wind that attempts to suck player down into the holes below, which would lead to instant death. There are also more enemies, traps, rail platforms, and teleporters, as well. when the final door is reached, a seemingly endless hallway begins as the door shuts behind and the laser behind activates. Enemies and traps will try to hinder while dashing through the hall, and Brevon will say |
+ | Shortly after the player enters this area, Brevon will shout "Open the airlocks!" as the airlocks open up, creating wind that attempts to suck player down into the holes below, which would lead to instant death. There are also more enemies, traps, rail platforms, and teleporters, as well. when the final door is reached, a seemingly endless hallway begins as the door shuts behind and the laser behind activates. Enemies and traps will try to hinder while dashing through the hall, and Brevon will say: |
| + | |||
| + | {{Quote|Run while you still can, creature!|Brevon's voice before the Boss}} |
||
| + | After a few obstacles, the Boss Fight against [[Syntax]] in Morpher-Mode will start. The boss has three basic attacks: Shooting down and shooting up, then transforms into Train Mode, where she shoots lasers, which travel a rectangle shaped route. In a certain section, the boss adds a Pogo Form causing shockwaves as it lands. In the last form, Syntax goes right side of the screen and shoots energy balls. |
||
=== Enemies === |
=== Enemies === |
||
| Line 35: | Line 41: | ||
* Shade Elite |
* Shade Elite |
||
* Super Turretus |
* Super Turretus |
||
| − | * Syntax (Major Boss) |
+ | * Syntax: Morpher-Mode (Major Boss) |
* Tankbot |
* Tankbot |
||
| − | == Final Dreadnought Round 2 |
+ | == Final Dreadnought Round 2 == |
| + | {{stageTab|Final Dreadnought|Final Dreadnought 2 Stage Select Icon.png}} |
||
| − | {{LevelInfobox |
||
| − | + | '''Final Dreadnought Round 2 '''is the 10th Stage in Freedom Planet, taking place in the Ship's Armory.{{LevelInfobox |
|
| + | |Name=[[File:Final_Dreadnought_Title_Logo.png|Round 2]] |
||
| + | Round 2 |
||
|Picture=FinalDreadnought2.jpg |
|Picture=FinalDreadnought2.jpg |
||
|Game=Freedom Planet |
|Game=Freedom Planet |
||
| Line 48: | Line 56: | ||
[[Milla Basset]] |
[[Milla Basset]] |
||
|Speedrun=9 minutes |
|Speedrun=9 minutes |
||
| + | |Theme=[[File:Final Dreadnought 2.ogg|Final Dreadnought 2|center]] |
||
|Boss=[[Serpentine|Mutant Serpentine]] |
|Boss=[[Serpentine|Mutant Serpentine]] |
||
|Minibosses=[[Robosquid]] |
|Minibosses=[[Robosquid]] |
||
| Line 53: | Line 62: | ||
=== Area 1 === |
=== Area 1 === |
||
| − | The player teleports into the area and there's several Axle Turrets at the beginning of the level. This area features plenty of enemies, traps, teleporters, |
+ | The player teleports into the area and there's several Axle Turrets at the beginning of the level. This area features plenty of enemies, traps, teleporters, barricades that use pressure mechanism by closing when going off from them, and locked doors that require keycards to open, like the ones seen in [[Thermal Base]]. As the player go, they'll ride elevator platforms to proceed even further up through the area as well. Along the way, if playing as [[Lilac]] or [[Carol]], Milla will appear out of the air ducts and assist the player by throwing [[Health Petal|Health Flowers]] and Shield Crystals (Wood and Water). In the section where Milla first appear in this stage, there's a [[Robosquid]], who needs to be damaged until it drops its keycard while avoiding the lasers it shoots. After reaching the bottom of the area, few more enemies and making use of the rising platforms before proceeding to the next area. |
=== Area 2 === |
=== Area 2 === |
||
| Line 59: | Line 68: | ||
This area is dedicated for rotating platforms while dealing with more enemies and avoiding more traps. Once our heroes reach a certain point, Brevon will say the following line:{{Quote|You're forgetting something important about our troops. They don't... ...need... ...oxygen!|Brevon as he cuts off the oxygen supply for our heroes}} |
This area is dedicated for rotating platforms while dealing with more enemies and avoiding more traps. Once our heroes reach a certain point, Brevon will say the following line:{{Quote|You're forgetting something important about our troops. They don't... ...need... ...oxygen!|Brevon as he cuts off the oxygen supply for our heroes}} |
||
| − | After this, the room goes dark and no more oxygen is available (this doesn't happen if playing as Milla). Unlike underwater, the oxygen gauge depletes faster for Lilac. But there are air bubbles scattered in this area to keep air gauge filled (but only |
+ | After this, the room goes dark and no more oxygen is available (this doesn't happen if playing as Milla). Unlike underwater, the oxygen gauge depletes faster for Lilac. But there are air bubbles scattered in this area to keep air gauge filled (but only on Casual and Easy Difficulties). To avoid running out of oxygen in the absence of the air bubbles on Normal and Hard Difficulties, Milla will assist by throwing Water Shield Crystals, which are the best and unavoidable way to get through the rest of the stage alive. Another key card must be found to proceed through the door as well. Later on, there's an elevator, which works by holding down press switches to raise platforms through three vertical chambers filled with spiked mines. Once the player reaches the top, the oxygen supply will come back on and there are four [[Extra Life|1-Ups]] in the way (A fifth one is hidden the other side of the bridge) before the Boss Fight with [[Serpentine]], who mutates into a monster and attacks the player. |
=== Enemies === |
=== Enemies === |
||
| Line 67: | Line 76: | ||
*Coil |
*Coil |
||
*Hooper MKII |
*Hooper MKII |
||
| − | *Mutant Serpentine (Major Boss) |
+ | *[[Serpentine/Boss|Mutant Serpentine]] (Major Boss) |
*Robo Squid (Mini-boss) |
*Robo Squid (Mini-boss) |
||
*Shade Elite |
*Shade Elite |
||
| Line 76: | Line 85: | ||
== Final Dreadnought Round 3 == |
== Final Dreadnought Round 3 == |
||
| + | {{stageTab|Final Dreadnought|Final Dreadnought 3 Stage Select Icon.png}} |
||
| − | {{LevelInfobox |
||
| − | + | '''Final Dreadnought Round 3 '''is the 11th Stage in Freedom Planet, taking place in the Ship's Warp Drive.{{LevelInfobox |
|
| + | |Name=[[File:Final_Dreadnought_Title_Logo.png|Round 3]] |
||
| + | Round 3 |
||
|Picture=FinalDreadnought3.jpg |
|Picture=FinalDreadnought3.jpg |
||
|Game=Freedom Planet |
|Game=Freedom Planet |
||
|Playable=[[Sash Lilac]]<br>[[Carol Tea]]<br>[[Milla Basset]] |
|Playable=[[Sash Lilac]]<br>[[Carol Tea]]<br>[[Milla Basset]] |
||
|Speedrun=6 minutes |
|Speedrun=6 minutes |
||
| ⚫ | |||
|Boss=[[Milla Basset|Mutant Milla]] (Lilac & Carol) |
|Boss=[[Milla Basset|Mutant Milla]] (Lilac & Carol) |
||
|previous = Final Dreadnought Round 2|next = Final Dreadnought Round 4}} |
|previous = Final Dreadnought Round 2|next = Final Dreadnought Round 4}} |
||
=== Area 1 === |
=== Area 1 === |
||
| − | The player teleports into the area like they did back in Final Dreadnought Round 2. This area introduces gates that boost character's speed, allowing to proceed even faster. There's also plenty of enemies and traps as well, including the rotating flame jets that are also introduced here. As with |
+ | The player teleports into the area like they did back in Final Dreadnought Round 2. This area introduces gates that boost character's speed, allowing to proceed even faster. There's also plenty of enemies and traps as well, including the rotating flame jets that are also introduced here. As with Thermal Base and Final Dreadnought 2, keycards are needed to open up keycard doors as well. Once again, Brevon taunts our heroes by announcing the following dialogue:{{Quote|Ohhh nooo! My ship is being infiltrated! What ever shall I do? How about THIS.|Brevon unleashing a massive payload of turret bullets at our heroes}} |
At this point the alarms will go off and Gatling Guns will be activated that follow movements with rapid blasts of double lasers enabled to soft lock. |
At this point the alarms will go off and Gatling Guns will be activated that follow movements with rapid blasts of double lasers enabled to soft lock. |
||
| Line 94: | Line 106: | ||
=== Area 3 === |
=== Area 3 === |
||
| − | When entering this area, a cutscene will play where Lilac and Carol use the devices they received from Torque to deactivate the ship's power supply to recover the Kingdom Stone, only for Brevon to show up with Milla as his hostage, forcing them to remove the device and reactivate the power supply for the sake of their friend's life. Brevon destroys the device, drops Milla and leaves the room. As the Player tries to comfort Milla, her eyes glow red and she transforms into a monster beginning the boss fight where Lilac and Carol are forced to fight against their own friend. After defeating Milla, another cutscene will play showing her falling into a death-like coma and the Character's reactions. Lilac will scream in anger, then Dragon Boosts out of the room, Carol will drys her tears, angrily pouncing out of the room and Torque will blame himself for what happened, then dashes out of the room in anger, cursing Brevon's name. |
+ | When entering this area, a cutscene will play where Lilac and Carol use the devices they received from [[Torque]] to deactivate the ship's power supply to recover the Kingdom Stone, only for Brevon to show up with Milla as his hostage, forcing them to remove the device and reactivate the power supply for the sake of their friend's life. Brevon destroys the device, drops Milla and leaves the room. As the Player tries to comfort Milla, her eyes glow red and she transforms into a monster beginning the boss fight where Lilac and Carol are forced to fight against their own friend. After defeating Milla, another cutscene will play showing her falling into a death-like coma and the Character's reactions. Lilac will scream in anger, then Dragon Boosts out of the room, Carol will drys her tears, angrily pouncing out of the room and Torque will blame himself for what happened, then dashes out of the room in anger, cursing Brevon's name. |
=== Milla's Cutscene === |
=== Milla's Cutscene === |
||
| − | If playing as Milla, there is no Boss Fight. Instead, a cutscene will play where Milla finds Torque with an unconscious Carol. He tells her that Brevon ambushed her and Lilac went off to stop him alone. Milla resolves to help Lilac and head off to do so after she promises Torque to keep an eye on her. |
+ | If playing as Milla, there is no Boss Fight, since she's playable in this round and the next. Instead, a cutscene will play where Milla finds Torque with an unconscious Carol. He tells her that Brevon ambushed her and Lilac went off to stop him alone. Milla resolves to help Lilac and head off to do so after she promises Torque to keep an eye on her. |
=== Enemies === |
=== Enemies === |
||
| Line 105: | Line 117: | ||
*Gatling Guns |
*Gatling Guns |
||
*Magmeon |
*Magmeon |
||
| − | *Mutant Milla (Major Boss, Lilac & Carol) |
+ | *[[Milla Basset/Boss|Mutant Milla]] (Major Boss, Lilac & Carol) |
*Pounder |
*Pounder |
||
*Rotorblade |
*Rotorblade |
||
| Line 114: | Line 126: | ||
== Final Dreadnought Round 4 == |
== Final Dreadnought Round 4 == |
||
| + | {{stageTab|Final Dreadnought|Final Dreadnought 4 Stage Select.png}} |
||
| − | {{LevelInfobox |
||
| + | '''Final Dreadnought Round 4 '''is the 12th and Final Stage in Freedom Planet, taking place within the heart of the Ship.{{LevelInfobox |
||
| ⚫ | |||
| + | |Name=[[File:Final_Dreadnought_Title_Logo.png|Round 4]] |
||
| + | Round 4 |
||
|Picture=FinalDreadnought4.jpg |
|Picture=FinalDreadnought4.jpg |
||
|Game=Freedom Planet |
|Game=Freedom Planet |
||
|Playable=[[Sash Lilac]]<br>[[Carol Tea]]<br>[[Milla Basset]] |
|Playable=[[Sash Lilac]]<br>[[Carol Tea]]<br>[[Milla Basset]] |
||
|Speedrun=8 minutes |
|Speedrun=8 minutes |
||
| + | |Theme=[[File:Final Dreadnought 4.ogg|center]] |
||
|Boss=[[Absolution]] (Phase 1)<br/>[[Brevon's Power Suit]] (Phase 2)<br>(Final Boss in Milla's Story)<br/>[[Lord Brevon]] (Phase 3) |
|Boss=[[Absolution]] (Phase 1)<br/>[[Brevon's Power Suit]] (Phase 2)<br>(Final Boss in Milla's Story)<br/>[[Lord Brevon]] (Phase 3) |
||
| Line 126: | Line 141: | ||
=== Area 1 === |
=== Area 1 === |
||
| − | This area begins in a vertical chamber that must be climb up through, |
+ | This area begins in a vertical chamber that must be climb up through. Along the way, they must fight enemies and make use of hovering springs and the disappearing blocks first seen in [[Pangu Lagoon]]. At one point, there comes a section, where every teleporter sends the player back to the bottom. When getting to the top of the section, there's one last teleporter, which takes upwards. After that, gravity fields must be used to climb even higher. At the top, it's a short straightaway to the right and then back down to the exit, where are few more enemies and more large turrets to fight. |
=== Area 2 === |
=== Area 2 === |
||
| Line 136: | Line 151: | ||
The Final Battle begins as the wall in the background disappears and a purple night sky is shown for effect as the Dreadnought moves across the sky. In the First Phase, Brevon jumps into the [[Absolution]] and attacks. After damaging the Absolution, it will fly to the center of the room, where Brevon exits out of it and equips his [[Brevon's Power Suit|Power Suit]], beginning the Second Phase of the fight. Before the Third Phase of the fight begins, a short cutscene will play for Lilac or Carol. Lilac will angrily state to Brevon that his machines will not save him from the "Dragon he has unleashed", that she will destroy everything thrown at her, making him pay for what's he's done, while Carol taunts Brevon, declaring she'll be taking the Kingdom Stone. Brevon, breaking out of his damaged Power Suit, states that he'd like to see them try, beginning the Third and Final Phase of the Boss Fight. |
The Final Battle begins as the wall in the background disappears and a purple night sky is shown for effect as the Dreadnought moves across the sky. In the First Phase, Brevon jumps into the [[Absolution]] and attacks. After damaging the Absolution, it will fly to the center of the room, where Brevon exits out of it and equips his [[Brevon's Power Suit|Power Suit]], beginning the Second Phase of the fight. Before the Third Phase of the fight begins, a short cutscene will play for Lilac or Carol. Lilac will angrily state to Brevon that his machines will not save him from the "Dragon he has unleashed", that she will destroy everything thrown at her, making him pay for what's he's done, while Carol taunts Brevon, declaring she'll be taking the Kingdom Stone. Brevon, breaking out of his damaged Power Suit, states that he'd like to see them try, beginning the Third and Final Phase of the Boss Fight. |
||
| − | After defeating Brevon, one more cutscene will play, showing the Character delivering the final blow. Lilac will Dragon Boost into Brevon as she shouts out "Nobody... hurts... Milla!!!", while Carol throws a barrage of claws and kicks at Brevon. In Milla's |
+ | After defeating Brevon, one more cutscene will play, showing the Character delivering the final blow. Lilac will Dragon Boost into Brevon as she shouts out "Nobody... hurts... Milla!!!", while Carol throws a barrage of claws and kicks at Brevon. In Milla's Story, a pestered Brevon will break out of his damaged Power Suit, then grabs Milla by the throat in an attempt to choke her to death. Luckily, she is saved by Lilac, who Dragon Boosts into Brevon (just like in her own ending). |
=== Enemies === |
=== Enemies === |
||
| Line 151: | Line 166: | ||
== Achievements == |
== Achievements == |
||
| + | {{Main|Freedom Planet/Achievements}} |
||
* '''Final Dreadnought 1 Speedrunner:''' Clear Final Dreadnought 1 in 5 minutes. |
* '''Final Dreadnought 1 Speedrunner:''' Clear Final Dreadnought 1 in 5 minutes. |
||
* '''Final Dreadnought 2 Speedrunner:''' Clear Final Dreadnought 2 in 9 minutes. |
* '''Final Dreadnought 2 Speedrunner:''' Clear Final Dreadnought 2 in 9 minutes. |
||
| Line 158: | Line 174: | ||
==Trivia== |
==Trivia== |
||
*Final Dreadnought is styled after the final sets of stages in several Mega Man games and various Mega Man-inspired games, most notably the Wily Castle Stages in the Classic Mega Man series as well as the Tower of Fate in Shovel Knight and both the Zeppelin Stages and the Iris Stages in the Rosenkreuzstilette series. One notable difference is the lack of a boss rush room near the end of Final Dreadnought. |
*Final Dreadnought is styled after the final sets of stages in several Mega Man games and various Mega Man-inspired games, most notably the Wily Castle Stages in the Classic Mega Man series as well as the Tower of Fate in Shovel Knight and both the Zeppelin Stages and the Iris Stages in the Rosenkreuzstilette series. One notable difference is the lack of a boss rush room near the end of Final Dreadnought. |
||
| − | *When Milla |
+ | *When Mutant Milla is defeated, player can destroy the other eye while she is exploding. |
*If there's Health Petals when the fight is over, they are collected if the character passes them during the animation. |
*If there's Health Petals when the fight is over, they are collected if the character passes them during the animation. |
||
*In the dialogue with Brevon, one of the text boxes of the playable character appears in same color scheme used when Brevon talks. |
*In the dialogue with Brevon, one of the text boxes of the playable character appears in same color scheme used when Brevon talks. |
||
| − | *In Final Dreadnought |
+ | *In Final Dreadnought 4, the Absolution, Brevon's Power Suit & Lord Brevon himself, are the only Bosses in ''Freedom Planet ''who have visible health meters, although Brevon's health meter appears into the original game's HUD as the final battle with him starts. The health meters of the Absolution and the Power Suit appear as the two columns in the foreground next to the Kingdom Stone: green for the Absolution and orange for Brevon's Power Suit. |
== Gallery == |
== Gallery == |
||
| + | |||
| + | === Objects === |
||
| + | <gallery> |
||
| + | Thermal Base + Final Dreadnought Door.gif|The same Keycard Doors from Thermal Base, primarily found in Rounds 2 & 3. |
||
| + | Final Dreadnought Gate.png|The Speed Gates primarily found in Round 3. |
||
| + | Vanishing Block.png| The same Vanishing Blocks from Pangu Lagoon, primarily found in Round 4. |
||
| + | </gallery> |
||
== Videos == |
== Videos == |
||
| + | ===Final Dreadnought 1=== |
||
| + | [[File:Freedom Planet - Torque - Final Dreadnought 1 Speedrun - 2-45.52|left|[[Torque]] Gameplay|200x200px]] |
||
| + | [[File:Freedom Planet - Final Dreadnought 1 Speedrun Spade (2-11)|centre|200x200px|[[Spade]] Gameplay]] |
||
| + | |||
| + | ===Final Dreadnought 2=== |
||
| + | [[File:Final Dreadnought 2 with Spade in 3-47.55|centre|200x200px|[[Spade]] Gameplay]] |
||
| + | ===Final Dreadnought 3=== |
||
| + | |||
| + | [[File:Freedom Planet- Speed Run- Final Dreadnought 3 *HARD MODE* (Lilac)|center|200x200px|[[Lilac]] Gameplay.]] |
||
| + | |||
| + | ===Final Dreadnought 4=== |
||
| + | [[File:Freedom Planet - Torque in Final Dreadnought 4|left|200x200px|[[Torque]] Gameplay]] |
||
{{StageTable}} |
{{StageTable}} |
||
[[Category:Stages]] |
[[Category:Stages]] |
||
Revision as of 19:07, 8 March 2020
The Dreadnought is a massive galactic warship that is owned and used by Lord Brevon to achieve his goal of galactic conquest. Prior to the events of Freedom Planet, the Dreadnought was locked in a space battle with the Spectrum Chasers, in orbit of planet Avalice. It was shot down and it crashed in the Snowfields near Shuigang. Unphased by this setback, Brevon formulated a plan to spark a civil war between the Three Kingdoms, so he could steal the Kingdom Stone in the confusion to power up the Dreadnought, leaving the planet on the brink of war.
The Dreadnought is also the setting of the Final Stage in Freedom Planet, called "Final Dreadnought", and is divided into 4 Rounds.
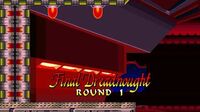
Final Dreadnought Round 1
| Overview | Transcript |
Final Dreadnought Round 1 is the 9th Stage in Freedom Planet, taking place within the Ship's Main Hanger.
Area 1
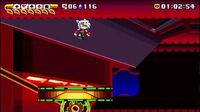
The area begins as the player bursts through the walls, running through corridors of the ship (Milla will enter through a hole in the ceiling instead). As that happens, Brevon can be heard saying, "We have intruders on the ship! Mobilize!" These corridors have plenty of enemies to deal with and traps to avoid, such as swooping lasers and energy orb-producing pillars. The level also introduces teleporters that can be used to get around the area, as well as platforms on rails that can be used to get across gaps in the floor. Further throughout the area, Brevon will appear on the screen in the background, give out a snarl, and say "GET THEM.". In this section, it's recommended to hop into teleporter located near this area and grab an Invincibility Shield Crystal, as the section contains a large group of enemies, such as Shade Elites and Tankbots. After that, it's a few more teleporters and rail platforms and a shorter straightaway to the exit.
Area 2
Shortly after the player enters this area, Brevon will shout "Open the airlocks!" as the airlocks open up, creating wind that attempts to suck player down into the holes below, which would lead to instant death. There are also more enemies, traps, rail platforms, and teleporters, as well. when the final door is reached, a seemingly endless hallway begins as the door shuts behind and the laser behind activates. Enemies and traps will try to hinder while dashing through the hall, and Brevon will say:
After a few obstacles, the Boss Fight against Syntax in Morpher-Mode will start. The boss has three basic attacks: Shooting down and shooting up, then transforms into Train Mode, where she shoots lasers, which travel a rectangle shaped route. In a certain section, the boss adds a Pogo Form causing shockwaves as it lands. In the last form, Syntax goes right side of the screen and shoots energy balls.
Enemies
See also: Main Enemy List
- Drone
- Fire Spitter
- Hopper
- Hopper MKII
- Pounder
- Shade Elite
- Super Turretus
- Syntax: Morpher-Mode (Major Boss)
- Tankbot
Final Dreadnought Round 2
| Overview | Transcript |
Final Dreadnought Round 2 is the 10th Stage in Freedom Planet, taking place in the Ship's Armory.
Area 1
The player teleports into the area and there's several Axle Turrets at the beginning of the level. This area features plenty of enemies, traps, teleporters, barricades that use pressure mechanism by closing when going off from them, and locked doors that require keycards to open, like the ones seen in Thermal Base. As the player go, they'll ride elevator platforms to proceed even further up through the area as well. Along the way, if playing as Lilac or Carol, Milla will appear out of the air ducts and assist the player by throwing Health Flowers and Shield Crystals (Wood and Water). In the section where Milla first appear in this stage, there's a Robosquid, who needs to be damaged until it drops its keycard while avoiding the lasers it shoots. After reaching the bottom of the area, few more enemies and making use of the rising platforms before proceeding to the next area.
Area 2
This area is dedicated for rotating platforms while dealing with more enemies and avoiding more traps. Once our heroes reach a certain point, Brevon will say the following line:
After this, the room goes dark and no more oxygen is available (this doesn't happen if playing as Milla). Unlike underwater, the oxygen gauge depletes faster for Lilac. But there are air bubbles scattered in this area to keep air gauge filled (but only on Casual and Easy Difficulties). To avoid running out of oxygen in the absence of the air bubbles on Normal and Hard Difficulties, Milla will assist by throwing Water Shield Crystals, which are the best and unavoidable way to get through the rest of the stage alive. Another key card must be found to proceed through the door as well. Later on, there's an elevator, which works by holding down press switches to raise platforms through three vertical chambers filled with spiked mines. Once the player reaches the top, the oxygen supply will come back on and there are four 1-Ups in the way (A fifth one is hidden the other side of the bridge) before the Boss Fight with Serpentine, who mutates into a monster and attacks the player.
Enemies
See also: Main Enemy List
- Axle Turret
- Buoy Buoy
- Coil
- Hooper MKII
- Mutant Serpentine (Major Boss)
- Robo Squid (Mini-boss)
- Shade Elite
- Slime
- Slug
- Sunfloris
- Tankbot
Final Dreadnought Round 3
| Overview | Transcript |
Final Dreadnought Round 3 is the 11th Stage in Freedom Planet, taking place in the Ship's Warp Drive.
Area 1
The player teleports into the area like they did back in Final Dreadnought Round 2. This area introduces gates that boost character's speed, allowing to proceed even faster. There's also plenty of enemies and traps as well, including the rotating flame jets that are also introduced here. As with Thermal Base and Final Dreadnought 2, keycards are needed to open up keycard doors as well. Once again, Brevon taunts our heroes by announcing the following dialogue:
At this point the alarms will go off and Gatling Guns will be activated that follow movements with rapid blasts of double lasers enabled to soft lock.
Area 2
There are more enemies in this area to deal with as proceeding through this area, as well as more Gatling Guns, speed gates, teleporters, and other traps. Another keycard must be found and use it to open a keycard door as well. The last obstacle before the exit door is a giant rotating ring with flames spouting inward. Though there is a small opening to which our heroes can use to enter and escape this minor obstacle.
Area 3
When entering this area, a cutscene will play where Lilac and Carol use the devices they received from Torque to deactivate the ship's power supply to recover the Kingdom Stone, only for Brevon to show up with Milla as his hostage, forcing them to remove the device and reactivate the power supply for the sake of their friend's life. Brevon destroys the device, drops Milla and leaves the room. As the Player tries to comfort Milla, her eyes glow red and she transforms into a monster beginning the boss fight where Lilac and Carol are forced to fight against their own friend. After defeating Milla, another cutscene will play showing her falling into a death-like coma and the Character's reactions. Lilac will scream in anger, then Dragon Boosts out of the room, Carol will drys her tears, angrily pouncing out of the room and Torque will blame himself for what happened, then dashes out of the room in anger, cursing Brevon's name.
Milla's Cutscene
If playing as Milla, there is no Boss Fight, since she's playable in this round and the next. Instead, a cutscene will play where Milla finds Torque with an unconscious Carol. He tells her that Brevon ambushed her and Lilac went off to stop him alone. Milla resolves to help Lilac and head off to do so after she promises Torque to keep an eye on her.
Enemies
See also: Main Enemy List
- Bubblorbiter
- DNA Cannon
- Gatling Guns
- Magmeon
- Mutant Milla (Major Boss, Lilac & Carol)
- Pounder
- Rotorblade
- Seeker
- Shade Elite
- Tankbot
- Terreon
Final Dreadnought Round 4
| Overview | Transcript |
Final Dreadnought Round 4 is the 12th and Final Stage in Freedom Planet, taking place within the heart of the Ship.
Area 1
This area begins in a vertical chamber that must be climb up through. Along the way, they must fight enemies and make use of hovering springs and the disappearing blocks first seen in Pangu Lagoon. At one point, there comes a section, where every teleporter sends the player back to the bottom. When getting to the top of the section, there's one last teleporter, which takes upwards. After that, gravity fields must be used to climb even higher. At the top, it's a short straightaway to the right and then back down to the exit, where are few more enemies and more large turrets to fight.
Area 2
In this area, more climbing back up even further, fighting more enemies, avoiding more traps, and making more use of the gravity fields along the way. This section introduces a mega laser firing downwards. The damage of the laser can kill the the player with one shot, but sometimes if lucky, some health is still left. Fortunately, there are short pause in-between firings, giving the player some time to act before the laser fires again. After finally reaching the top again, it's just a short straightaway to the exit at the right, lined with just a few more enemies. Just as the player enters the final area, the entire screen will turn red as a dramatic effect, showing that the Player is about to face the Final Boss of the Game: Lord Brevon.
Area 3
As they enter the final hallway, the player fights a few more stationary turrets while being locked on target by an off-screen gun/cannon, which doesn't appear in Milla's story, as they're heading towards the final gravity field. After entering said gravity field and riding it up to the final room above, the Character will have a smack-down talk with a certain heartless monster sitting on the pillar to the right of the one the Kingdom Stone is in: Lilac shouts at Brevon enraged, that she will never forgive him for mutating Milla, Carol angrily states that what he did to Milla is unforgivable and wants to see him dead, and Milla, with tearful terror in her eyes, desperately asks him where Lilac is. Brevon, of course, responds to the former two, stating that he has no use for forgiveness from someone putting his homeworld at risk for an "Oversized Battery", while he tries to make Milla despair when he claims what a fool Lilac was for challenging him and even claims to have killed her. He offers them one final chance to leave, but the Character refuses, and from there, the Three-Phase (Two-Phase as Milla) Final Battle will begin against the alien overlord, Lord Brevon himself.
The Final Battle begins as the wall in the background disappears and a purple night sky is shown for effect as the Dreadnought moves across the sky. In the First Phase, Brevon jumps into the Absolution and attacks. After damaging the Absolution, it will fly to the center of the room, where Brevon exits out of it and equips his Power Suit, beginning the Second Phase of the fight. Before the Third Phase of the fight begins, a short cutscene will play for Lilac or Carol. Lilac will angrily state to Brevon that his machines will not save him from the "Dragon he has unleashed", that she will destroy everything thrown at her, making him pay for what's he's done, while Carol taunts Brevon, declaring she'll be taking the Kingdom Stone. Brevon, breaking out of his damaged Power Suit, states that he'd like to see them try, beginning the Third and Final Phase of the Boss Fight.
After defeating Brevon, one more cutscene will play, showing the Character delivering the final blow. Lilac will Dragon Boost into Brevon as she shouts out "Nobody... hurts... Milla!!!", while Carol throws a barrage of claws and kicks at Brevon. In Milla's Story, a pestered Brevon will break out of his damaged Power Suit, then grabs Milla by the throat in an attempt to choke her to death. Luckily, she is saved by Lilac, who Dragon Boosts into Brevon (just like in her own ending).
Enemies
See also: Main Enemy List
- Absolution (Phase 1 Final Boss)
- Beast Iris
- Brevon's Power Suit (Phase 2 Final Boss)
- DNA Cannon
- Gatling Gun
- Lord Brevon (Phase 3 Final Boss, Lilac & Carol)
- Shade Elite
- Spider Beamer
- Terreon
Achievements
- Main article: Freedom Planet/Achievements
- Final Dreadnought 1 Speedrunner: Clear Final Dreadnought 1 in 5 minutes.
- Final Dreadnought 2 Speedrunner: Clear Final Dreadnought 2 in 9 minutes.
- Final Dreadnought 3 Speedrunner: Clear Final Dreadnought 3 in 6 minutes.
- Final Dreadnought 4 Speedrunner: Clear Final Dreadnought 4 in 8 minutes.
Trivia
- Final Dreadnought is styled after the final sets of stages in several Mega Man games and various Mega Man-inspired games, most notably the Wily Castle Stages in the Classic Mega Man series as well as the Tower of Fate in Shovel Knight and both the Zeppelin Stages and the Iris Stages in the Rosenkreuzstilette series. One notable difference is the lack of a boss rush room near the end of Final Dreadnought.
- When Mutant Milla is defeated, player can destroy the other eye while she is exploding.
- If there's Health Petals when the fight is over, they are collected if the character passes them during the animation.
- In the dialogue with Brevon, one of the text boxes of the playable character appears in same color scheme used when Brevon talks.
- In Final Dreadnought 4, the Absolution, Brevon's Power Suit & Lord Brevon himself, are the only Bosses in Freedom Planet who have visible health meters, although Brevon's health meter appears into the original game's HUD as the final battle with him starts. The health meters of the Absolution and the Power Suit appear as the two columns in the foreground next to the Kingdom Stone: green for the Absolution and orange for Brevon's Power Suit.
Gallery
Objects
")
")
Videos
Final Dreadnought 1
Final Dreadnought 2

Final Dreadnought 3

Final Dreadnought 4

| |